Up to date
This page is up to date for Godot 4.2.
If you still find outdated information, please open an issue.
The main game scene
Now it's time to bring everything we did together into a playable game scene.
Utwórz nową scenę i dodaj a Node o nazwie Main. (Powodem, dla którego używamy Node zamiast Node2D jest to, że węzeł ten będzie kontenerem zajmującym się logiką gry. Sam nie wymaga funkcjonalności 2D.)
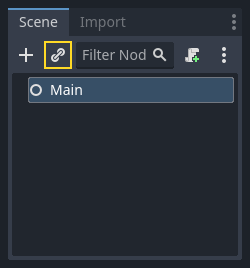
Click the Instance button (represented by a chain link icon) and select your saved
player.tscn.
Następnie dodaj następujące węzły jako dzieci sceny Main i nazwij je tak, jak pokazano na rysunku (wartości są podane w sekundach):
Timer (o nazwie
MobTimer) - czasomierz do kontroli częstotliwości tworzenia przeciwnikówTimer (o nazwie
ScoreTimer) - czasomierz mający co sekundę zwiększać liczbę zdobytych punktówTimer (o nazwie
StartTimer) - czasomierz służący podaniu opóźnienia przed rozpoczęciemMarker2D (named
StartPosition) - to indicate the player's start position
Ustawić właściwość Czas oczekiwania każdego z węzłów Timer w następujący sposób:
MobTimer:0.5ScoreTimer:1StartTimer:2
Dodatkowo, ustawmy właściwość One Shot w StartTimer na "Włącz" i ustaw właściwość Position z węzła StartPosition na (240, 450) (znajduje się pod Transform w Inspektorze).
Tworzenie przeciwników
Węzeł główny Main odpowiadał będzie za tworzenie nowych przeciwników. Chcemy, aby pojawiali się oni w losowych miejscach na krawędzi ekranu. Dodajmy węzeł Path2D o nazwie MobPath jako dziecko Main. Po wybraniu Path2D na górze edytora pojawi się kilka nowych przycisków:

Select the middle one ("Add Point") and draw the path by clicking to add the points at the corners shown. To have the points snap to the grid, make sure "Use Grid Snap" and "Use Smart Snap" are both selected. These options can be found to the left of the "Lock" button, appearing as a magnet next to some dots and intersecting lines, respectively.

Ważne
Narysuj ścieżkę zgodnie z ruchem zegara, albo twoi przeciwnicy będą tworzyli się na zewnątrz zamiast do wewnątrz!
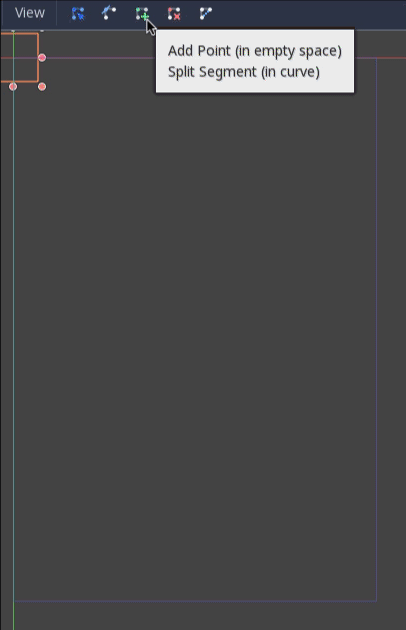
Po umieszczeniu punktu 4, kliknijmy przycisk "Zamknij krzywą", a krzywa zostanie ukończona.
Teraz, gdy ścieżka jest zdefiniowana, dodaj węzeł PathFollow2D <class_PathFollow2D>`jako dziecko ``MobPath` i nazwij go MobSpawnLocation. Węzeł ten będzie automatycznie obracał się i podążał ścieżką, tak abyśmy mogli go wykorzystać do wybrania losowego położenia i kierunku wzdłuż ścieżki.
Twoja scena powinna wyglądać tak:

Główny skrypt
Add a script to Main. At the top of the script, we use
@export var mob_scene: PackedScene to allow us to choose the Mob scene we want
to instance.
extends Node

@export var mob_scene: PackedScene
var score
using Godot;

public partial class Main : Node
{
    // Don't forget to rebuild the project so the editor knows about the new export variable.

    [Export]
    public PackedScene MobScene { get; set; }

    private int _score;
}
Click the Main node and you will see the Mob Scene property in the Inspector
under "Script Variables".
Możesz przypisać wartość dla tej właściwości na dwa sposoby:
Drag
mob.tscnfrom the "FileSystem" dock and drop it in the Mob Scene property.Click the down arrow next to "[empty]" and choose "Load". Select
mob.tscn.
Next, select the instance of the Player scene under Main node in the Scene dock,
and access the Node dock on the sidebar. Make sure to have the Signals tab selected
in the Node dock.
You should see a list of the signals for the Player node. Find and
double-click the hit signal in the list (or right-click it and select
"Connect..."). This will open the signal connection dialog. We want to make a
new function named game_over, which will handle what needs to happen when a
game ends. Type "game_over" in the "Receiver Method" box at the bottom of the
signal connection dialog and click "Connect". You are aiming to have the hit signal
emitted from Player and handled in the Main script. Add the following code
to the new function, as well as a new_game function that will set
everything up for a new game:
func game_over():
    $ScoreTimer.stop()
    $MobTimer.stop()

func new_game():
    score = 0
    $Player.start($StartPosition.position)
    $StartTimer.start()
public void GameOver()
{
    GetNode<Timer>("MobTimer").Stop();
    GetNode<Timer>("ScoreTimer").Stop();
}

public void NewGame()
{
    _score = 0;

    var player = GetNode<Player>("Player");
    var startPosition = GetNode<Marker2D>("StartPosition");
    player.Start(startPosition.Position);

    GetNode<Timer>("StartTimer").Start();
}
Now connect the timeout() signal of each of the Timer nodes (StartTimer,
ScoreTimer, and MobTimer) to the main script. StartTimer will start
the other two timers. ScoreTimer will increment the score by 1.
func _on_score_timer_timeout():
    score += 1

func _on_start_timer_timeout():
    $MobTimer.start()
    $ScoreTimer.start()
private void OnScoreTimerTimeout()
{
    _score++;
}

private void OnStartTimerTimeout()
{
    GetNode<Timer>("MobTimer").Start();
    GetNode<Timer>("ScoreTimer").Start();
}
In _on_mob_timer_timeout(), we will create a mob instance, pick a random
starting location along the Path2D, and set the mob in motion. The
PathFollow2D node will automatically rotate as it follows the path, so we
will use that to select the mob's direction as well as its position.
When we spawn a mob, we'll pick a random value between 150.0 and
250.0 for how fast each mob will move (it would be boring if they were
all moving at the same speed).
Nowa instancja musi być dodana do sceny za pomocą add_child().
func _on_mob_timer_timeout():
    # Create a new instance of the Mob scene.
    var mob = mob_scene.instantiate()

    # Choose a random location on Path2D.
    var mob_spawn_location = $MobPath/MobSpawnLocation
    mob_spawn_location.progress_ratio = randf()

    # Set the mob's direction perpendicular to the path direction.
    var direction = mob_spawn_location.rotation + PI / 2

    # Set the mob's position to a random location.
    mob.position = mob_spawn_location.position

    # Add some randomness to the direction.
    direction += randf_range(-PI / 4, PI / 4)
    mob.rotation = direction

    # Choose the velocity for the mob.
    var velocity = Vector2(randf_range(150.0, 250.0), 0.0)
    mob.linear_velocity = velocity.rotated(direction)

    # Spawn the mob by adding it to the Main scene.
    add_child(mob)
private void OnMobTimerTimeout()
{
    // Note: Normally it is best to use explicit types rather than the `var`
    // keyword. However, var is acceptable to use here because the types are
    // obviously Mob and PathFollow2D, since they appear later on the line.

    // Create a new instance of the Mob scene.
    Mob mob = MobScene.Instantiate<Mob>();

    // Choose a random location on Path2D.
    var mobSpawnLocation = GetNode<PathFollow2D>("MobPath/MobSpawnLocation");
    mobSpawnLocation.ProgressRatio = GD.Randf();

    // Set the mob's direction perpendicular to the path direction.
    float direction = mobSpawnLocation.Rotation + Mathf.Pi / 2;

    // Set the mob's position to a random location.
    mob.Position = mobSpawnLocation.Position;

    // Add some randomness to the direction.
    direction += (float)GD.RandRange(-Mathf.Pi / 4, Mathf.Pi / 4);
    mob.Rotation = direction;

    // Choose the velocity.
    var velocity = new Vector2((float)GD.RandRange(150.0, 250.0), 0);
    mob.LinearVelocity = velocity.Rotated(direction);

    // Spawn the mob by adding it to the Main scene.
    AddChild(mob);
}
Ważne
Why PI? In functions requiring angles, Godot uses radians,
not degrees. Pi represents a half turn in radians, about
3.1415 (there is also TAU which is equal to 2 * PI).
If you're more comfortable working with degrees, you'll need to
use the deg_to_rad() and rad_to_deg() functions to
convert between the two.
Testowanie sceny
Let's test the scene to make sure everything is working. Add this new_game
call to _ready():
func _ready():
    new_game()
public override void _Ready()
{
    NewGame();
}
Let's also assign Main as our "Main Scene" - the one that runs automatically
when the game launches. Press the "Play" button and select main.tscn when
prompted.
Wskazówka
If you had already set another scene as the "Main Scene", you can right
click main.tscn in the FileSystem dock and select "Set As Main Scene".
Powinieneś móc poruszać postacią gracza, widzieć pojawiające się potwory i znikającą postać gracza, gdy zostanie uderzona przez potwora.
When you're sure everything is working, remove the call to new_game() from
_ready() and replace it with pass.
What's our game lacking? Some user interface. In the next lesson, we'll add a title screen and display the player's score.