Attention: Here be dragons
This is the latest
(unstable) version of this documentation, which may document features
not available in or compatible with released stable versions of Godot.
Checking the stable version of the documentation...
Coding the player
In this lesson, we'll add player movement, animation, and set it up to detect collisions.
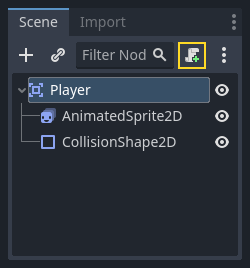
To do so, we need to add some functionality that we can't get from a built-in
node, so we'll add a script. Click the Player node and click the "Attach
Script" button:
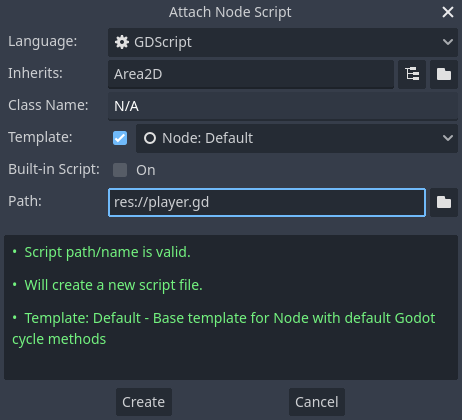
W oknie ustawień skryptu możesz pozostawić ustawienia domyślne. Kliknij na "Utwórz":
Informacja
Jeśli tworzysz skrypt w języku C# lub innym, wybierz odpowiedni język z rozwijanego menu Język przed naciśnięciem przycisku Utwórz.
Informacja
If this is your first time encountering GDScript, please read Scripting languages before continuing.
Zacznij od zadeklarowania zmiennych, których ten obiekt będzie potrzebował:
extends Area2D

@export var speed = 400 # How fast the player will move (pixels/sec).
var screen_size # Size of the game window.
using Godot;

public partial class Player : Area2D
{
    [Export]
    public int Speed { get; set; } = 400; // How fast the player will move (pixels/sec).

    public Vector2 ScreenSize; // Size of the game window.
}
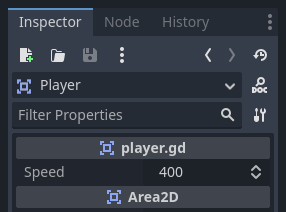
Using the export keyword on the first variable speed allows us to set
its value in the Inspector. This can be handy for values that you want to be
able to adjust just like a node's built-in properties. Click on the Player
node and you'll see the property now appears in the Inspector in a new section
with the name of the script. Remember, if you change the value here, it will
override the default value specified in the script (the script won't be modified).
Ostrzeżenie
If you're using C#, you need to (re)build the project assemblies whenever you want to see new export variables or signals. This build can be manually triggered by clicking the Build button at the top right of the editor.

Your player.gd script should already contain
a _ready() and a _process() function.
If you didn't select the default template shown above,
create these functions while following the lesson.
Funkcja _ready() jest wywoływana, gdy węzeł wchodzi do drzewa sceny, co jest dobrym momentem, aby ustalić rozmiar okna gry:
func _ready():
    screen_size = get_viewport_rect().size
public override void _Ready()
{
    ScreenSize = GetViewportRect().Size;
}
Teraz możemy użyć funkcji _process() do zdefiniowania, co gracz będzie robił. _process() jest wywoływany co klatkę, więc użyjemy go do aktualizacji elementów naszej gry, które, jak się spodziewamy, będą się często zmieniać. W przypadku naszego gracza, musimy zrobić, co następuje:
Sprawdzić dane wejściowe.
Przesunąć gracza w określonym kierunku.
Odtworzyć odpowiednią animację.
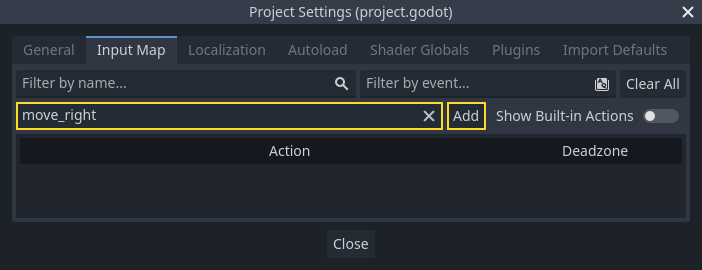
First, we need to check for input - is the player pressing a key? For this game, we have 4 direction inputs to check. Input actions are defined in the Project Settings under "Input Map". Here, you can define custom events and assign different keys, mouse events, or other inputs to them. For this game, we will map the arrow keys to the four directions.
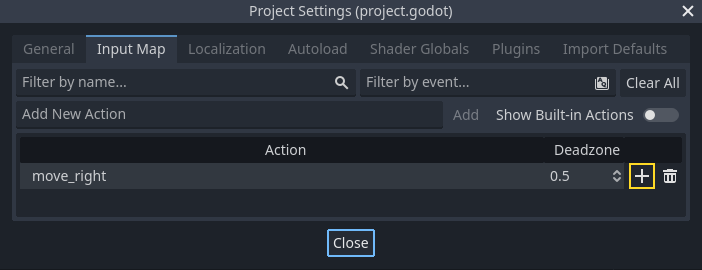
Click on Project -> Project Settings to open the project settings window and
click on the Input Map tab at the top. Type "move_right" in the top bar and
click the "Add" button to add the move_right action.
We need to assign a key to this action. Click the "+" icon on the right, to open the event manager window.
The "Listening for Input..." field should automatically be selected. Press the "right" key on your keyboard, and the menu should look like this now.
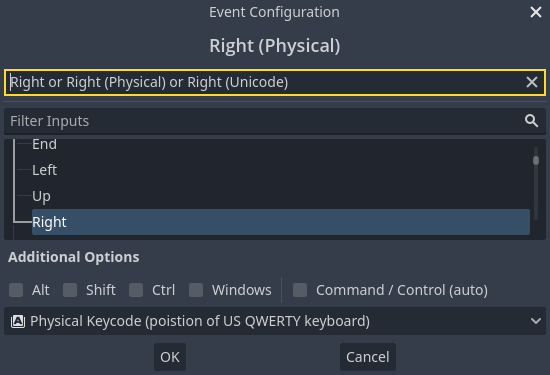
Select the "ok" button. The "right" key is now associated with the move_right action.
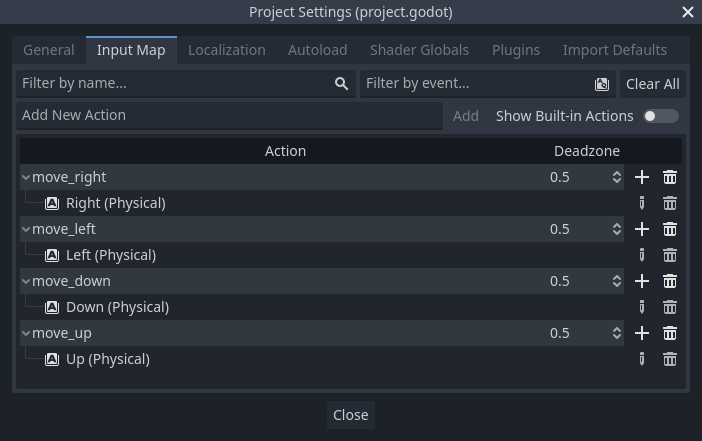
Repeat these steps to add three more mappings:
move_leftmapped to the left arrow key.move_upmapped to the up arrow key.And
move_downmapped to the down arrow key.
Your input map tab should look like this:
Click the "Close" button to close the project settings.
Informacja
We only mapped one key to each input action, but you can map multiple keys, joystick buttons, or mouse buttons to the same input action.
Za pomocą Input.is_action_pressed() możesz sprawdzić, czy klawisz jest wciśnięty. Naciśnięty klawisz zwraca true. Wartość false zostanie zwrócona, gdy klawisz nie jest wciśnięty.
func _process(delta):
    var velocity = Vector2.ZERO # The player's movement vector.
    if Input.is_action_pressed("move_right"):
        velocity.x += 1
    if Input.is_action_pressed("move_left"):
        velocity.x -= 1
    if Input.is_action_pressed("move_down"):
        velocity.y += 1
    if Input.is_action_pressed("move_up"):
        velocity.y -= 1

    if velocity.length() > 0:
        velocity = velocity.normalized() * speed
        $AnimatedSprite2D.play()
    else:
        $AnimatedSprite2D.stop()
public override void _Process(double delta)
{
    var velocity = Vector2.Zero; // The player's movement vector.

    if (Input.IsActionPressed("move_right"))
    {
        velocity.X += 1;
    }

    if (Input.IsActionPressed("move_left"))
    {
        velocity.X -= 1;
    }

    if (Input.IsActionPressed("move_down"))
    {
        velocity.Y += 1;
    }

    if (Input.IsActionPressed("move_up"))
    {
        velocity.Y -= 1;
    }

    var animatedSprite2D = GetNode<AnimatedSprite2D>("AnimatedSprite2D");

    if (velocity.Length() > 0)
    {
        velocity = velocity.Normalized() * Speed;
        animatedSprite2D.Play();
    }
    else
    {
        animatedSprite2D.Stop();
    }
}
We start by setting the velocity to (0, 0) - by default, the player
should not be moving. Then we check each input and add/subtract from the
velocity to obtain a total direction. For example, if you hold right and
down at the same time, the resulting velocity vector will be (1, 1).
In this case, since we're adding a horizontal and a vertical movement, the
player would move faster diagonally than if it just moved horizontally.
Możemy tego uniknąć, jeśli znormalizujemy prędkość, co oznacza ustawienie jej length (długości) na 1 i pomnożymy ją przez pożądaną prędkość. Oznacza to rezygnację z szybszego ruchu po przekątnej.
Wskazówka
Jeśli nigdy wcześniej nie używałeś matematyki wektorowej lub potrzebujesz przypomnienia, możesz zobaczyć wyjaśnienie użycia wektorów w Godocie (Wektory). Ogólnie dobrze jest to wiedzieć, jednak wiedza ta nie będzie konieczna dla reszty tego poradnika.
We also check whether the player is moving so we can call play() or
stop() on the AnimatedSprite2D.
Wskazówka
$ is shorthand for get_node(). So in the code above,
$AnimatedSprite2D.play() is the same as
get_node("AnimatedSprite2D").play().
In GDScript, $ returns the node at the relative path from the
current node, or returns null if the node is not found. Since
AnimatedSprite2D is a child of the current node, we can use
$AnimatedSprite2D.
Teraz, gdy mamy kierunek ruchu, możemy zaktualizować położenie gracza. Możemy również użyć clamp(), aby zapobiec opuszczenia ekranu przez naszą postać. Klampowanie wartości oznacza ograniczenie jej do danego zakresu. Dodaj na dole funkcji _process podany fragment kodu (upewnij się przy tym, że nie zostanie on wciągnięty pod else):
position += velocity * delta
position = position.clamp(Vector2.ZERO, screen_size)
Position += velocity * (float)delta;
Position = new Vector2(
    x: Mathf.Clamp(Position.X, 0, ScreenSize.X),
    y: Mathf.Clamp(Position.Y, 0, ScreenSize.Y)
);
Wskazówka
Parametr delta w funkcji _process() odnosi się do długości ramki - czasu, jaki zajęło wykonanie poprzedniej ramki. Użycie tej wartości zapewnia, że ruch pozostanie spójny nawet w przypadku zmiany ilości klatek.
Click "Run Current Scene" (F6, Cmd + R on macOS) and confirm you can move the player around the screen in all directions.
Ostrzeżenie
Jeśli otrzymasz błąd w panelu "Debugger", mówiący
Próba wywołania funkcji 'play' w podstawowej 'instancji null' w instancji o wartości null
this likely means you spelled the name of the AnimatedSprite2D node
wrong. Node names are case-sensitive and $NodeName must match
the name you see in the scene tree.
Wybieranie animacji
Now that the player can move, we need to change which animation the
AnimatedSprite2D is playing based on its direction. We have the "walk" animation,
which shows the player walking to the right. This animation should be flipped
horizontally using the flip_h property for left movement. We also have the
"up" animation, which should be flipped vertically with flip_v for downward
movement. Let's place this code at the end of the _process() function:
if velocity.x != 0:
    $AnimatedSprite2D.animation = "walk"
    $AnimatedSprite2D.flip_v = false
    # See the note below about the following boolean assignment.
    $AnimatedSprite2D.flip_h = velocity.x < 0
elif velocity.y != 0:
    $AnimatedSprite2D.animation = "up"
    $AnimatedSprite2D.flip_v = velocity.y > 0
if (velocity.X != 0)
{
    animatedSprite2D.Animation = "walk";
    animatedSprite2D.FlipV = false;
    // See the note below about the following boolean assignment.
    animatedSprite2D.FlipH = velocity.X < 0;
}
else if (velocity.Y != 0)
{
    animatedSprite2D.Animation = "up";
    animatedSprite2D.FlipV = velocity.Y > 0;
}
Informacja
Przypisania logiczne w powyższym kodzie są częstym skrótem dla programistów. Ponieważ robimy test porównawczy (boolean), a także przypisanie wartości logicznej boolean, możemy wykonać obie te czynności w tym samym czasie. Rozważmy pokazany tu kod w porównaniu do powyższego jednowierszowego przypisania logicznego:
if velocity.x < 0:
    $AnimatedSprite2D.flip_h = true
else:
    $AnimatedSprite2D.flip_h = false
if (velocity.X < 0)
{
    animatedSprite2D.FlipH = true;
}
else
{
    animatedSprite2D.FlipH = false;
}
Odtwórz scenę ponownie i sprawdź, czy wszystkie animacje są odtwarzane poprawnie w każdym z kierunków.
Wskazówka
Częstym błędem jest tu podanie niepoprawnych nazw animacji. Nazwy animacji w panelu SpriteFrames muszą odpowiadać nazwom wpisanym w kodzie. Jeśli nazywamy animację "Walk", musimy również użyć nazwy pisanej z wielkiej litery "W" w kodzie.
Gdy upewnisz się, że mechanika poruszania się działa poprawnie, dodaj pokazaną linijkę do _ready(), aby ukryć naszego gracza przy starcie gry:
hide()
Hide();
Przygotowanie do kolizji
Chcemy, aby Player wykrywał, kiedy zostanie uderzony przez wroga, jednak nie mamy jeszcze żadnych wrogów! Nie ma się jednak co tym przejmować, ponieważ korzystać będziemy z Godotowej funkcji sygnału (signal).
Add the following at the top of the script. If you're using GDScript, add it after
extends Area2D. If you're using C#, add it after public partial class Player : Area2D:
signal hit
// Don't forget to rebuild the project so the editor knows about the new signal.

[Signal]
public delegate void HitEventHandler();
This defines a custom signal called "hit" that we will have our player emit
(send out) when it collides with an enemy. We will use Area2D to detect the
collision. Select the Player node and click the Signals tab next to the
Inspector tab to see the list of signals the player can emit:
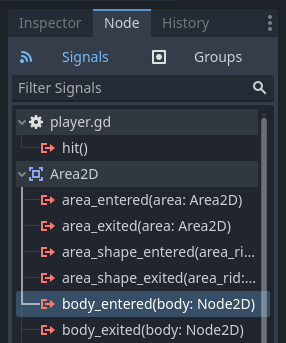
Notice our custom "hit" signal is there as well! Since our enemies are going to
be RigidBody2D nodes, we want the body_entered(body: Node2D) signal. This
signal will be emitted when a body contacts the player. Click "Connect.." and
the "Connect a Signal" window appears.
Godot will create a function with that exact name directly in script for you. You don't need to change the default settings right now.
Ostrzeżenie
If you're using an external text editor (for example, Visual Studio Code), a bug currently prevents Godot from doing so. You'll be sent to your external editor, but the new function won't be there.
In this case, you'll need to write the function yourself into the Player's script file.

Note the green icon indicating that a signal is connected to this function; this does not mean the function exists, only that the signal will attempt to connect to a function with that name, so double-check that the spelling of the function matches exactly!
Next, add this code to the function:
func _on_body_entered(_body):
    hide() # Player disappears after being hit.
    hit.emit()
    # Must be deferred as we can't change physics properties on a physics callback.
    $CollisionShape2D.set_deferred("disabled", true)
// We also specified this function name in PascalCase in the editor's connection window.
private void OnBodyEntered(Node2D body)
{
    Hide(); // Player disappears after being hit.
    EmitSignal(SignalName.Hit);
    // Must be deferred as we can't change physics properties on a physics callback.
    GetNode<CollisionShape2D>("CollisionShape2D").SetDeferred(CollisionShape2D.PropertyName.Disabled, true);
}
Za każdym razem, gdy wróg uderzy w gracza, wysłany zostanie sygnał. Po tym zdarzeniu musimy wyłączyć kolizje gracza, aby nie wywołać więcej niż jednego sygnału hit.
Informacja
Disabling the area's collision shape can cause an error if it happens
in the middle of the engine's collision processing. Using
set_deferred() tells Godot to wait to disable the shape until it's
safe to do so.
Ostatnim elementem naszego gracza jest dodanie funkcji, którą możemy wywołać, aby go zresetować podczas uruchomienia nowej gry.
func start(pos):
    position = pos
    show()
    $CollisionShape2D.disabled = false
public void Start(Vector2 position)
{
    Position = position;
    Show();
    GetNode<CollisionShape2D>("CollisionShape2D").Disabled = false;
}
With the player working, we'll work on the enemy in the next lesson.